LaTex Plot Axis 3D

There are many packages in LaTeX to plot 3D, including tikz-3dplot, and other exotic packages.

The easiest one to use for plotting a simple 3D graph, with xyz axis and origin, is Pgfplots in my opinion.

The code to plot the diagram below is included for reference.

First, we need to add the following in the preamble of the LaTeX document:

\usepackage{pgfplots}
\pgfplotsset{compat=1.8}

Then, to draw the actual diagram, the following simple code will do:

\begin{figure}[htbp]
\begin{center}
\begin{tikzpicture}
\begin{axis}[
  ticks=none,
  view={60}{30},
  axis lines=center,
  width=10cm,height=10cm,
  xmin=-10,xmax=10,ymin=-10,ymax=10,zmin=-10,zmax=10,
  xlabel={$x$},ylabel={$y$},zlabel={$z$}
]

% plot dots for the points
\addplot3 [only marks] coordinates {(1,2,3) (4,5,6)};

% plot dashed lines to axes
\addplot3 [no marks,densely dashed] coordinates {(1,2,3) (4,5,6)};

% label points
\node [above] at (axis cs:1,2,3) {$A (1,2,3)$};
\node [above right] at (axis cs:4,5,6) {$B (4,5,6)$};
\node [below left] at (axis cs:0,0,0) {$O$};
\end{axis}
\end{tikzpicture}
\caption{default}
\label{default}
\end{center}
\end{figure}
Advertisement

Latex footnote without symbol/asterisk

How to suppress symbol for LaTeX footnote

There are many solutions online, for example this Stack Exchange post. The one that worked for me is as follows:

\documentclass{article}

%write the following immediately after documentclass{} if possible.

\makeatletter

\def\blfootnote{\gdef\@thefnmark{}\@footnotetext}

\makeatother

Subsequently, you can then use the \blfootnote command to write a footnote without any symbol (no asterisk, no star, etc.)

LaTeX Table Style Guidelines

Drawing LaTeX tables is well known to be quite troublesome. Fortunately, there are some excellent tools online to generate LaTeX code for tables, e.g. Convert Excel to LaTeX.

Even after that, there are some stylistic dilemmas, for instance how many borders to include in the table?

I found this powerpoint slide that summarizes very nicely what to do (and what not to do) to create a nice LaTeX table. Source: https://inf.ethz.ch/personal/markusp/teaching/guides/guide-tables.pdf

Most Important Guidelines for Making Tables with LaTeX

  • Avoid vertical lines
  • Avoid “boxing up” cells, usually 3 horizontal lines are enough: above, below, and after heading (see examples in the guide above)
  • Avoid double horizontal lines
  • Enough space between rows
  • If in doubt, align left

The above 5 guidelines were invaluable and cleared up my doubts on how to make a nice table using LaTeX.

LaTeX Horizontal Flowchart (Workflow)

Source: https://tex.stackexchange.com/questions/368482/one-horizontal-line-flow-chart?rq=1

Just found an excellent source on how to draw a simple (slightly fanciful) horizontal flowchart using LaTeX (TikZ).

The output is very neat:

The code is reproduced here (in case the original source gets deleted):

\documentclass[tikz, margin=3mm]{standalone}
\usetikzlibrary{arrows.meta,
                chains,
                positioning,
                shapes.geometric
                }
% for fancy looks of data storages
\begin{document}
    \begin{tikzpicture}[
    node distance = 5mm and 7mm,
      start chain = going right,
 disc/.style = {shape=cylinder, draw, shape aspect=0.3,
                shape border rotate=90,
                text width=17mm, align=center, font=\linespread{0.8}\selectfont},
  mdl/.style = {shape=ellipse, aspect=2.2, draw},
  alg/.style = {draw, align=center, font=\linespread{0.8}\selectfont}
                    ]
    \begin{scope}[every node/.append style={on chain, join=by -Stealth}]
\node (n1) [disc] {Training\\ data};
\node (n2) [alg]  {Learning\\ algorithm};
\node (n3) [mdl]  {Model};
\node (n4) [disc] {Test\\ data};
\node (n3) [mdl]  {Accuracy};
    \end{scope}
\node[below=of n2]  {Step 1: Training};
\node[below=of n4]  {Step 2: Tresting};
    \end{tikzpicture}
\end{document}

Multiline Flow Chart

For flowcharts that exceed one line (and hence require a line break), the following Tikz code is very helpful! (Source: https://tex.stackexchange.com/questions/149602/drawing-flow-diagram-in-latex-using-tikz)

\documentclass[border=10pt]{standalone}
\usepackage{tikz}
\usetikzlibrary{arrows,positioning,shapes.geometric}
\begin{document}
    \begin{tikzpicture}[>=latex']
        \tikzset{block/.style= {draw, rectangle, align=center,minimum width=2cm,minimum height=1cm},
        rblock/.style={draw, shape=rectangle,rounded corners=1.5em,align=center,minimum width=2cm,minimum height=1cm},
        input/.style={ % requires library shapes.geometric
        draw,
        trapezium,
        trapezium left angle=60,
        trapezium right angle=120,
        minimum width=2cm,
        align=center,
        minimum height=1cm
    },
        }
        \node [rblock]  (start) {Start};
        \node [block, right =2cm of start] (acquire) {Acquire Image};
        \node [block, right =2cm of acquire] (rgb2gray) {RGB to Gray};
        \node [block, right =2cm of rgb2gray] (otsu) {Localized OTSU \\ Thresholding};
        \node [block, below right =2cm and -0.5cm of start] (gchannel) {Subtract the \\ Green Channel};
        \node [block, right =2cm of gchannel] (closing) {Morphological \\ Closing};
        \node [block, right =2cm of closing] (NN) {Sign Detection \\ Using NN};
        \node [input, right =2cm of NN] (limit) {Speed \\ Limit};
        \node [coordinate, below right =1cm and 1cm of otsu] (right) {};  %% Coordinate on right and middle
        \node [coordinate,above left =1cm and 1cm of gchannel] (left) {};  %% Coordinate on left and middle

%% paths
        \path[draw,->] (start) edge (acquire)
                    (acquire) edge (rgb2gray)
                    (rgb2gray) edge (otsu)
                    (otsu.east) -| (right) -- (left) |- (gchannel)
                    (gchannel) edge (closing)
                    (closing) edge (NN)
                    (NN) edge (limit)
                    ;
    \end{tikzpicture}
\end{document}

Output:

How to type Chinese characters in LaTeX (on Mac, using TeXShop)

This is one of the easiest ways to type Chinese characters in LaTeX on Mac, using the default TeXShop editor. (If you know of an easier way, please let me know in the comments below!)

I have tried for hours, experimenting with different packages, before “discovering” the following steps. Hope it helps!

Step 1) Add “\usepackage{ctex}” to the beginning of the document. This will load the main package ctex.

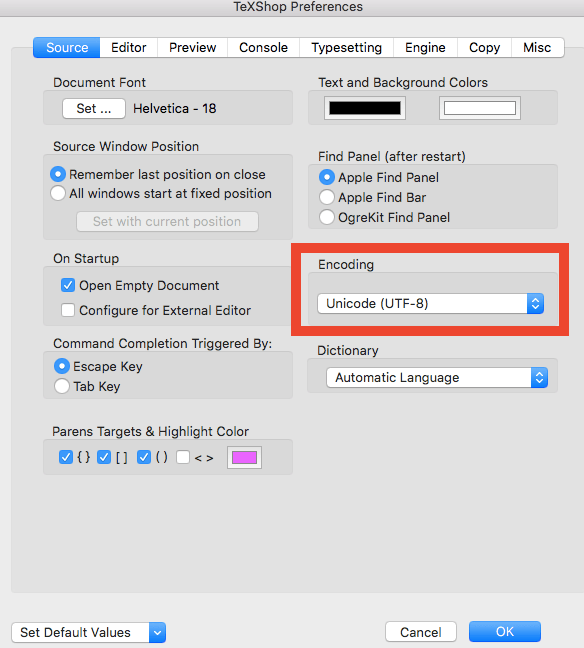
Step 2) It is very important to save the LaTeX file in UTF-8 format, otherwise all Chinese characters will appear as question marks. The preferred way to do this is via:

TeXShop > Preferences > Encoding = Unicode (UTF-8). (see image below)

This will “permanently” set the format as UTF-8 by default. If you don’t do this, an annoying thing that can happen is that your TeX file reverts to “non-UTF8” upon saving. That means, the Chinese characters may appear correctly at first, but once you re-save the file, all Chinese characters become question marks again.

Alternatively, if you don’t want to set UTF-8 as default, you may add the following line to the very first line of the TeX document:

% !TEX encoding = UTF-8 Unicode

This will make TeXShop remember to save it in UTF-8 format every time.

Step 3) Just type Chinese characters directly into the LaTeX file. No “wrapper” is needed around the Chinese characters.

Step 4) When you compile the document, be sure to compile it by XeLaTeX. You can select this option next to the “Typeset” button. If you compile it using normal LaTeX, you will get the following error:

“Critical ctex error:”fontset-unavailable

CTeX fontset `fandol’ is unavailable in current mode.”


For Windows users, I suppose the above steps still work. I have not tried it personally though. Other packages may work only for Windows/Mac specifically since each system have different preloaded Chinese fontsets.


Hyperref Problems with Chinese TeX

A known problem is that hyperref does not work well with xetex or xeLaTeX. This may be a problem if you are using xeLaTeX in conjunction with Hyperref. The proposed solution is to use the option

\usepackage[xetex]{hyperref}

Note that if you have multiple options for hyperref, xetex should be the first of all the options.

TeXShop opens Chinese documents showing Gibberish

This is quite common, especially if your Mac or Windows system is not set with Chinese as primary language. A proposed solution (there may be a better solution) is to:

  • Set the primary language of your Mac / Windows as Chinese. The entire system, including all your taskbars, icons should be in Chinese.
  • Open the TeX file containing Chinese characters with Notepad/TextEdit, not TeXShop. Ideally, the Chinese characters should display ok there.
  • Copy and paste the entire file from NotePad to TeXShop.
  • Add the line % !TEX encoding = UTF-8 Unicode at the start of your TeX document to ensure that the Chinese characters will continue to stay there after closing of the document.

Drawing Chemistry Diagrams in LaTeX

The web application “mol2chemfig” is very amazing. (http://py-chemist.com/mol_2_chemfig).

Especially the search function, where one can just type the name of the chemical and out comes the chemfig code where it can be pasted to LaTeX. The mol2chemfig package needs to be imported in LaTeX before the code can be compiled. Alternatively, one can just save the PDF image (vector graphics) generated by the web app.

Below is a screenshot of what is happening:

How to draw polygons with angles (LaTeX Tikz)

Just learnt some amazing angle-drawing techniques using LaTeX Tikz.

Although cumbersome to code, the benefit of using LaTeX to draw diagrams is that it matches the font of your document, and is easier to customize and edit. Also, it is “vector graphics” in the sense that even if you zoom in, it is in perfect resolution.

Sample code shown below

Important: In order to use Tikz to draw angles you need to load the following packages:

\usepackage{tikz}
\usetikzlibrary{calc,patterns,angles,quotes}

Sample Tikz code for drawing the above figure (polygon angles)

\begin{figure}[htbp]
\begin{center}
\begin{tikzpicture}
\coordinate (v0) at (-2.2,1.2);
\coordinate (v1) at (0,0);
\coordinate (v2) at (2.2,1.8);
\coordinate (v3) at (0,3);

\filldraw
(v1) circle (2pt) node[align=left, below] {$v_1$}
-- (v2) circle (2pt) node[align=center, below, right] {$v_2$}
-- (v3) circle (2pt) node[align=left, above] {$v_3$}
-- (v0) circle (2pt) node[align=left, above, left] {$v_0$}
-- (v1);
\pic [draw, -, "$\alpha_0$", angle eccentricity=1.5] {angle = v1--v0--v3};
\pic [draw, -, "$\alpha_1$", angle eccentricity=1.5] {angle = v2--v1--v0};
\pic [draw, -, "$\alpha_2$", angle eccentricity=1.5] {angle = v3--v2--v1};
\pic [draw, -, "$\alpha_3$", angle eccentricity=1.5] {angle = v0--v3--v2};
\end{tikzpicture}
\caption{}
\label{fig:quad}
\end{center}
\end{figure}

Clearly, the code can be modified for any polygon be it triangle, pentagon, etc. Also, if you are curious how to post source code in WordPress.com, it is by surrounding your source code with [ code ] [/ code]. It also supports a “lang=” option, see more at https://en.support.wordpress.com/code/posting-source-code/.

How to do Proof by Cases in LaTeX

If one searches online, one will find many different methods to do “proof by cases” in LaTeX. The most simple and convenient method in my opinion is to use the description environment.

Something like this:

\begin{proof} Proceed by cases.
\begin{description}
\item[Case 1: This.] And so on.
\item[Case 2: That.] And more.
\end{proof}

Source: Reddit

No additional package is needed. One drawback is there is no auto-numbering, but I am sure that is still ok, unless your proof has many many cases.

LaTeX Thesis Template

This site (https://www.sharelatex.com/blog/2013/08/09/thesis-series-pt5.html) has a guide on how to create your own \LaTeX template for a thesis. Quite nice and simple, and easily customizable.

The actual Tex source code is found here: https://www.sharelatex.com/project/51fa85c3db89c3c351085071.

I like it as the source code is neat and clean, you can easily edit it if you know some basic Latex. Some other templates out there are quite complex and convoluted, it is hard to customize it.

Groups of order pq

In this post, we will classify groups of order pq, where p and q are primes with p<q. It turns out there are only two isomorphism classes of such groups, one being a cyclic group the other being a semidirect product.

Let G be the group of order pq.

Case 1: p does not divide q-1.

By Sylow’s Third Theorem, we have n_p\equiv 1\pmod p, n_p\mid q, n_q\equiv 1\pmod q, n_q\mid p.

Since n_q\mid p, n_q=1 or p. Since p<q and n_q\equiv 1\pmod q, we conclude n_q=1. Similarly, since n_p\mid q, n_p=1 or q. Since p\nmid q-1, n_p\equiv 1\pmod p implies n_p=1.

Let P, Q be the Sylow p-subgroup and Sylow q-subgroup respectively. By Lagrange’s Theorem, P\cap Q=\{1_G\}. Thus |P\cup Q|=p+q-1. Since \displaystyle pq\geq 2q>p+q>p+q-1, there is a non-identity element in G which is not in P\cup Q. Its order has to be pq, thus G is cyclic. Therefore G\cong\mathbb{Z}_{pq}.

Case 2: p divides q-1.

From previous arguments, n_q=1 hence Q is normal. Thus QP=PQ so PQ is a subgroup of G. \displaystyle |PQ|=\frac{|P||Q|}{|P\cap Q|}=pq, thus G=PQ. \text{Aut}(Q)\cong(\mathbb{Z}/q\mathbb{Z})^*\cong\mathbb{Z}_{q-1} is cyclic, thus it has a unique subgroup P' of order p, where P'=\{x\mapsto x^i\mid i\in\mathbb{Z}_q, i^p=1\}.

Let a and b be generators for P and Q respectively. Suppose the action of a on Q by conjugation is x\mapsto x^{i_0}, where i_0^p=1. (We may conclude this since the action of a on Q by conjugation is an automorphism which has order 1 or P, thus it lies in P'.)

If i_0=1, then G=P\times Q\cong\mathbb{Z}_{pq}.

If i_0\neq 1, then \displaystyle G=PQ=\langle P,Q\rangle=\langle a,b\mid a^p=b^q=1, aba^{-1}=b^{i_0}\rangle. Choosing a different i_0 amounts to choosing a different generator a for P, and hence does not result in a new isomorphism class.

Updated LaTeX to WordPress Converter

WordPress is notorious for not accepting \begin{align} … \end{align} as it is not in math mode.

I have updated the LaTeX to WordPress Converter to change \begin{align} … \end{align} to $l atex\begin{aligned} … \end{aligned}$ which works in WordPress.

Test Input:

Let $h=\chi_{[0,1]}$, the characteristic function of $[0,1]$. We have $\|\chi_{[0,1]}\|_\infty=1$, so $\chi_{[0,1]}\in L^\infty$. Then,
\begin{align*}
(Hh)(x)&=\frac{1}{\pi}\int_0^1\frac{1}{x-t}\ dt\\
&=\frac{1}{\pi}[-\ln|x-t|]_0^1\\
&=\frac{1}{\pi}\ln\frac{|x|}{|x-1|}.
\end{align*}
As $x\to 1$, $(Hh)(x)\to\infty$. Thus, $Hh$ is an unbounded function, so $H$ is not bounded as a map: $L^\infty\to L^\infty$.
\[\frac{a}{b}=c\]

Test Output:

Let h=\chi_{[0,1]}, the characteristic function of [0,1]. We have \|\chi_{[0,1]}\|_\infty=1, so \chi_{[0,1]}\in L^\infty. Then,
\begin{aligned}  (Hh)(x)&=\frac{1}{\pi}\int_0^1\frac{1}{x-t}\ dt\\  &=\frac{1}{\pi}[-\ln|x-t|]_0^1\\  &=\frac{1}{\pi}\ln\frac{|x|}{|x-1|}.  \end{aligned}
As x\to 1, (Hh)(x)\to\infty. Thus, Hh is an unbounded function, so H is not bounded as a map: L^\infty\to L^\infty.
\displaystyle \frac{a}{b}=c


Updated LaTex Javascript Converter

I have updated the LaTeX to WordPress Converter to change \[ \] to $l atex\displaystyle and $ respectively.

Note that \[ … \] is preferable over $$ … $$.

Test code:

Input:

If $(X,\Sigma,\mu)$ is a measure space, $f$ is a non-negative measurable extended real-valued function, and $\epsilon>0$, then \[\mu(\{x\in X: f(x)\geq\epsilon\})\leq\frac{1}{\epsilon}\int_X f\,d\mu.\]

Define \[s(x)=\begin{cases}
\epsilon, &\text{if}\ f(x)\geq\epsilon\\
0, &\text{if}\ f(x)<\epsilon.
\end{cases}\]
Then $0\leq s(x)\leq f(x)$. Thus $\int_X f(x)\,d\mu\geq\int_X s(x)\,d\mu=\epsilon\mu(\{x\in X: f(x)\geq\epsilon\})$. Dividing both sides by $\epsilon>0$ gives the result.

Output:

If (X,\Sigma,\mu) is a measure space, f is a non-negative measurable extended real-valued function, and \epsilon>0, then \displaystyle \mu(\{x\in X: f(x)\geq\epsilon\})\leq\frac{1}{\epsilon}\int_X f\,d\mu.

Define \displaystyle s(x)=\begin{cases}  \epsilon, &\text{if}\ f(x)\geq\epsilon\\  0, &\text{if}\ f(x)<\epsilon.  \end{cases}
Then 0\leq s(x)\leq f(x). Thus \int_X f(x)\,d\mu\geq\int_X s(x)\,d\mu=\epsilon\mu(\{x\in X: f(x)\geq\epsilon\}). Dividing both sides by \epsilon>0 gives the result.

$$…$$ should not be used in LaTeX

Just learnt today that the popular command $$…$$ in LaTeX should not be used as it produces wrong spacing and is an obsolete command.

The correct command should be \[ … \].

Both have the same number of characters and thus are just as easy to type, so it is probably a good idea to switch to \[ … \].

See http://tex.stackexchange.com/questions/503/why-is-preferable-to

LaTeX to WordPress Converter

Just created a LaTeX to WordPress Converter: http://mathtuition88.blogspot.sg/2015/12/latex-to-wordpress-converter.html

Currently it is a very basic converter, just changes “$abc$” to “$ latex abc$”. To change back from WordPress to LaTeX, a simple text editor will do the job, with replace “$ latex ” with “$”.

Test code:

LaTeX: From the above inequality $|z^n|>|a_1z^{n-1}+\ldots+a_n|$ we can conclude that the polynomial $p_t(z)=z^n+t(a_1z^{n-1}+\ldots+a_n)$ has no roots on the circle $|z|=r$ when $0\leq t\leq 1$.

WordPress: From the above inequality |z^n|>|a_1z^{n-1}+\ldots+a_n| we can conclude that the polynomial p_t(z)=z^n+t(a_1z^{n-1}+\ldots+a_n) has no roots on the circle |z|=r when 0\leq t\leq 1.

How to type LaTeX in WordPress without using “$latex”

Currently, LaTeX is well supported in WordPress, however there is one practical issue when typing LaTeX in WordPress, the need to type “$latex” for every single math expression! It gets pretty troublesome after a while.

For those familiar with LaTeX, one would know that for ordinary LaTeX typesetting, typing double $ will do, there is no need to type the word LaTeX. If I remember correctly, for Blogger there is no need to type “$latex”, hence it is a uniquely WordPress issue.

So far, I have not found any solution to this issue. (I am using WordPress.com hosted WordPress). Any readers who happen to know a solution, please enlighten me by dropping a comment! It will be greatly appreciated.

WordPress vs Blogger LaTeX:

https://mathtuition88.com/2014/12/25/math-formula-in-wordpress-vs-blogspot/


LaTeX Beginner’s Guide

Math Formula in WordPress vs Blogspot

Refering to How to write Math Formulas on Blogspot / Blogger, Blogspot is also capable of rendering beautiful Math Equations based on LaTeX.

blogger latex
Produced by Blogspot using MathJax

Blogger uses MathJax for rendering the Math Formulas, which look like the ones shown above.

Let’s try the WordPress version and readers can judge for themselves which is better.

\displaystyle a^p \equiv a \pmod p

\displaystyle\int_0^{\frac{\pi}{2}} \sin x\ dx=1

My personal opinion is: they look the same to be honest. However, the Blogger way of typing is much more convenient, just using $ and $$, as opposed to WordPress requiring “$latex” and “$latex\displaystyle”, which is more cumbersome especially for long texts. However, experts like Terence Tao have opted for WordPress, which shows that WordPress does probably have some advantages.


Featured Book:

The LaTeX Companion (Tools and Techniques for Computer Typesetting)

Interactive Astronomy using 3D Computer Graphics

This is a school project on using 3D Computer Graphics. It explores a phenomenon whereby a sundial can actually go backwards in the tropics!

Abstract:

Understanding spherical astronomy requires good spatial visualization. Unfortunately, it is very hard to make good three dimensional (3D) illustrations and many illustrations from standard textbooks are in fact incorrect. There are many programs that can be used to create illustrations, but in this report we have focused on TEX-friendly, free programs. We have compared MetaPost, PSTricks, Asymptote and Sketch by creating a series of illustrations related to the problem of why sundials sometimes go backwards in the tropics.

sphere

In it, the Hezekiah Phenomenon is being discussed.

Quote: First, we would like to explain where the name Hezekiah Phenomenon comes from. In the Bible there is a story about God making the shadow of the sundial move backward as a sign for King Hezekiah.

The Bible gives two versions of the story of King Hezekiah and the sundial. First in 2 Kings, Chapter 20.

8 And Hezekiah said unto Isaiah, What [shall be] the sign that the LORD will heal me, and that I shall go up into the house of the LORD the third day? 9 And Isaiah said, This sign shalt thou have of the LORD, that the LORD will do the thing that he hath spoken: shall the shadow go forward ten degrees, or go back ten degrees? 10 And Hezekiah answered, It is a light thing for the shadow to go down ten degrees: nay, but let the shadow return backward ten degrees. 11 And Isaiah the prophet cried unto the LORD: and he brought the shadow ten degrees backward, by which it had gone down in the dial of Ahaz. (2 Kings 20: 8–11, King James Version)